Templeton Elementary School Art
Literacy Program
Ancient Egyptian Art Style
From the time of King Tut
Art
vocabulary words: hieroglyphs, cartouche
(Note: the exhibits to show the kids are the picture
of Tut’s mask, the picture of the couple standing together, and the shrink-wrapped
pictures from the district.)
This month we are not going to learn about a
particular artist. Instead, we are going
to learn a little bit about ancient Egyptian art, art that was created between
3000 BC and 30 AD, which is about 2000 to 5000 years ago. Not much that people have made or built can
last that long. The only reasons we have
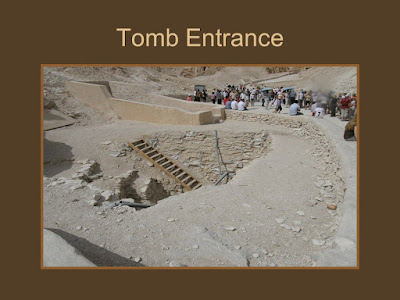
any Egyptian art that old to look at is that Egypt is a desert country, with
dry air that helps to preserve things, and because most of the art that we have
comes from tombs, where it was buried many, many centuries ago, and that helped
to preserve it for us to see now.
Egyptians had a religion with many gods and
goddesses, who controlled everything in the world. They built huge temples to different gods,
and performed rituals all the time to keep their gods happy. Egyptians believed in an afterlife where
spirits of people who died would stay alive, and they would want to have their
own things around them to use. They
preserved important people as mummies, and filled their tombs with furniture,
jewelry, containers of food, and all kinds of artwork. Some items like furniture and containers had
carved relief designs on them, often covered in hammered sheets of gold. Walls
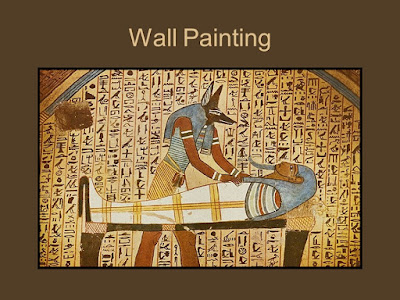
had designs painted on them. The
pictures were often stories, with ancient picture writing, called hieroglyphs, mixed in with the pictures to tell
what was happening. When the name of a
pharaoh, or king, was written, it would be surrounded with an oval shape called
a cartouche. Only royal names were written inside a cartouche.
The most famous pharaoh of Ancient Egypt to us is
Tutankhamun, or King Tut. His tomb was
discovered in 1922, and was the first tomb found that had not been robbed of
most of its gold and precious jewels. Tut
was called “the boy king”, because he became king when he was only 10 years
old, and died when he was 18. The
artifacts found in his tomb have been displayed around the world for people to
see. This is a picture of the mask over
his mummy.
His names
are written in the cartouches below it.
A really interesting thing about Ancient Egyptian art is that it changed
very little for thousands of years. It
is famous for the way people are usually shown – their faces are shown from the
side, their chests from the front, and their legs from the side, usually apart
like they are walking.
The art looks very flat. When some figures are shown bigger than
others, it is because they liked to show the most important people as the
biggest, and the least important people as very small.
How people were shown in ancient Egyptian art,
surrounded by hieroglyphs.
Templeton Elementary School Art
Literacy Program
Ancient Egypt / King Tut Embossing
Project
This project is slightly
simpler for kindergarten and 1st grade vs. grades 2 to 5, so pay
attention to the instructions. All
supplies will be on the carts, but youngest kids will not color with markers
and have different pictures to work from.
Getting
ready
Presenters, first
thing, please sign onto the Art Lit cart sign-out sheet on the wall. That way we know where the art carts are at
any time. Presenters should only be
coming in at a time they have officially signed up for. Next, please check the Art Lit cart for the
supplies you will need. The presentation
folders and the tools should all be kept on the carts. You will need to take a bag of foil sheets
and a bag of pictures to trace from the counter. Take the right pictures for your grade
level. These are the supplies you will
need:
On the cart: Take
from the counter:
Presentation folder and art samples 1 Bag of 28 cut foil sheets
Desk protector sheets (30) 1 Bag of
Egyptian pictures to trace
Bag of ballpoint pens (30)
Roll of masking tape
6 bags of permanent markers
A bag of folded newsprint sheets (30)
In the
classroom, set up the kids’ places for them.
Each student starts out with a desk protector, a folded piece of
newsprint, a piece of embossing foil, and a ballpoint pen. For grades 2 to 5, each table group gets a bag
of permanent markers to share. If you
think your class is mature enough to wait for instruction, you could stick two
short bits of tape loosely on each child’s place mat. Otherwise you will need to go around the room
handing out strips of tape. (We have
only limited tape – we cannot waste it.
Aim for no more than 6 inches per student at most.) You can decide how to distribute the pictures
kids will trace from. You might fan them
out in your hand and let kids pick, or however you think will work for your
classroom.
We will keep
an extra roll of tape or two on the counter for when the ones on the carts run
out.
The
Project
(Things
you might want to say to the kids are in purple.)
Try to think of questions to ask the kids as you go
along. Present the art style to the
kids and show examples. Then show them
the samples of our project. Put the
sheet of hieroglyphics on the docucam.
If
you have 2nd to 5th graders – have the kids write their names and
their teacher’s name on the back (silver) side of the foil with a permanent
marker, NOT with a ballpoint. You don’t
want to emboss the names into the pictures.
If
you have kindergartners or 1st
graders – you
will need to take a permanent marker around the room to put their names and their
teacher’s name on the back (silver) side of their foil. You can do this while they are working on
their pictures.
Introduction
Today
we are going to make embossed pictures that look like golden artwork from King
Tut’s tomb. “Embossing”
means making a raised picture by pressing into something, like metal or
paper. We will tape a picture onto the back side of heavy foil, then use a
ballpoint pen to draw over the lines and emboss the picture onto the foil. After the pictures are done, we will add
Egyptian hieroglyphic writing. For grades 2-5 After you do your embossing, you can color
parts of your designs with permanent markers if you like, to make it look like gold
with jewels.
One
important thing about this project – be careful how hard you press with the
ballpoint pens. If you press too hard
you can poke a hole through the foil, and we don’t want holes in it. If you don’t press hard enough, the lines
will not show. You can check how it is
coming along as you go by carefully turning it over to the gold side.
Step 1 – Hand out the pictures to trace
from. However you want to organize it,
help the kids to tape the picture onto the back side of the foil. The silver side is the back side. It needs to be taped with a piece of tape at
the top and one at the bottom so the picture will not move around while they
work.
We’re
going to tape the pictures you are using onto the back of the foil – the silver
side. You want it to stay in place while
you are working. After you have the
picture taped in place, put the foil on top of the folded newspaper. The gold side should be facing down, and the
picture should be facing up. The
newspaper gives you a little bit of padding under the foil so the lines will
emboss better. Use your ballpoint pen to
draw over the lines. Go over all of them
until the whole picture is done. You can
turn the foil over from time to time to check on how it is coming, and to see
if you missed some lines. Don’t take the
tape off until the whole picture is totally done.
Step 2 – When the pictures are completely
drawn, have the kids take off the tape and the used tracing pictures.
When
you are finished with your picture, you can draw some hieroglyphics like the
Egyptians would have had in their artwork.
We are still working on the back side of the foil, the silver
side. (Note – whatever the kids draw on the back will come
out backwards on the front, but it probably doesn’t matter with the
hieroglyphs.)
Step 3 –
For Kinders
and 1st graders, it’s time to admire their work, they are done.
For grades 2
to 5 – Now you can think about whether you want to
add some color to your picture or not.
Ancient Egyptians would use colored enamel or attach precious stones to
their gold work sometimes, and leave it plain gold other times. If you want to add some color, use the
markers on the gold side of the picture.
Remember, these are permanent
markers, so be careful not to get any ink on your clothes or the desks.
Afterwards
/ Clean up
Please make
sure to collect all the tools before you leave the room (place mats, bags of permanent
markers, ballpoint pens, bag of folded newspaper pieces, and most important –
the masking tape.) Ask kids to look for
missing items. Please make sure the markers
get pretty much back in their own bags.
We will be re-using the newspapers. I’ll leave a few extra on the counter. Let me know if some disappear so I can bring
in more.
Put the
finished art in a folder with your teacher’s name on it on the Art Lit counter.
Thank you! November 2018
Laura Cox


No comments:
Post a Comment