Pages

Thursday, November 15, 2018

Beatrix Potter


Templeton Elementary School Art Literacy 

Program


Beatrix Potter Bio Presentation

(Note:  as exhibits, show the kids the portrait of Beatrix Potter, the mushrooms on the back, and put the large page of characters on the docucam so they can see all of them.)

Beatrix Potter was an English author and illustrator who wrote 30 books, most of them children’s books about animal characters.  If you have ever seen Peter Rabbit, Jemima Puddle Duck or Squirrel Nutkin, you have seen her work.

Beatrix Potter lived from 1866 to 1943.  She grew up in a wealthy family, with a governess, so she didn’t play with other children much.  Her family loved the outdoors, travelling often to Scotland and the beautiful Lakes District in England, and she loved to observe nature.  Landscapes, plants and animals all became the subjects of her study and her artwork.

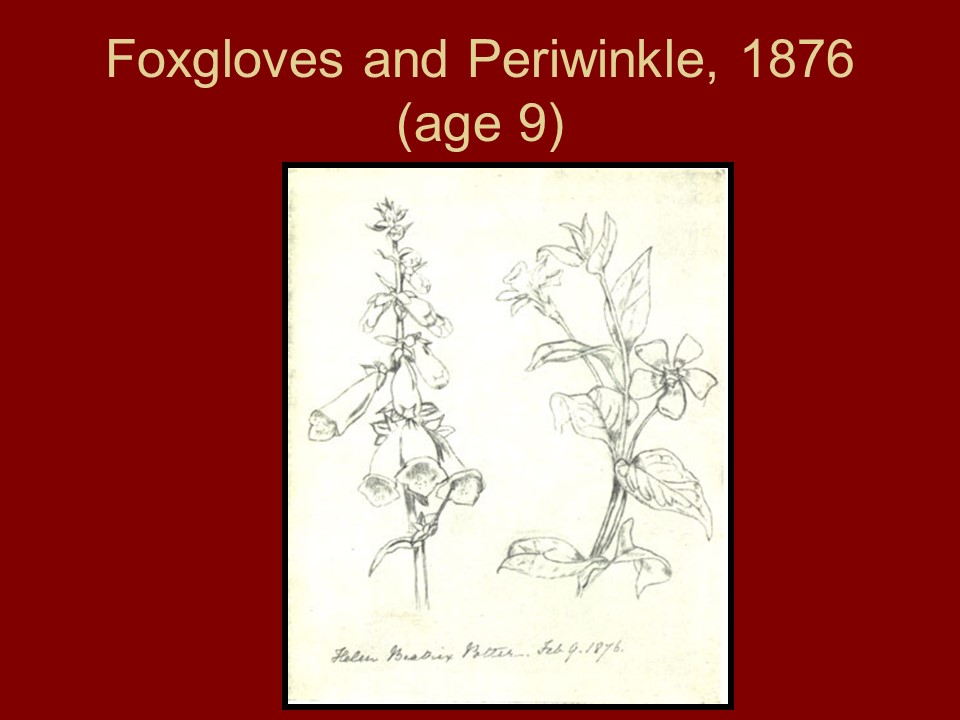
Beatrix was very intelligent, and interested in almost all types of natural science.  She was also very talented at watercolor painting, and some of her first nature studies were done about different kinds of fungus and mushrooms.  She wrote books about them and was known as an expert. 

Beatrix Potter was also very interested in fairy tales and fantasy stories.  She began to make her own illustrations, often using her own pet rabbits and mice as subjects.  Her ability to combine very detailed and naturalistic pictures of animals with fantasy elements, like clothes and tiny houses, made her a perfect children’s book author and illustrator. 

During visits to the Lake District, Beatrix Potter wrote charming illustrated story letters to children of her friends.  In her thirties, Beatrix Potter published the Tale of Peter Rabbit on her own, and it was so successful that she began writing children’s books full time.

When Beatrix Potter made money from her books, she bought herself a farm in the Lake District of England, where she bred prize winning sheep and farmed even as she continued to write and illustrate books.  As she could afford to, she bought up as many surrounding farms as she could just so the land would be preserved and no one would ever build on it.  When she died, her land was donated to the British National Trust, and made into a national park so everyone could come and see it. 


Beatrix Potter, 1866 to 1943


Peter Rabbit


Jemima Puddle Duck  


 Pigling Bland


Squirrel Nutkin                           


Mr. Tod Fox


                 Mouse from Tailor of                
Gloucester

Town Mouse


Mushroom Illustration

Beatrix Potter Watercolor Pencil Project

Getting ready

Presenters, first thing, please sign onto the Art Lit cart sign-out sheet on the wall.  That way we know where the art carts are at any time.  Presenters should only be coming in at a time they have officially signed up for.  Next, please check the Art Lit cart for the supplies you will need.  The presentation folders and the tools should all be kept on the carts.  You will need to take paper and paper towels from the counter, unless the person before you put them on the cart. You will need to fill up two jugs with water if you are going to a portable classroom where there is no water.  These are the supplies you will need:


On the cart:

Presentation folder and art samples
Desk protector sheets (30)
Sets of watercolor pencils (28 bags)
Bag of animal stencils (18)
Paint brushes in container (28)
empty water jars
2 jugs for water (fill them if needed)
Bag of pencils and pencil sharpener


Take from the counter:

1 Bag of 28 little paper towels
1 stack of 28 sheets of white paper
1 drying rack with a garbage bag to cover it if it is rainy.
(If dry art is on already on the rack, please put it into a folder)


Take a moment to look at the bags of watercolor pencils.  Make sure none of them have broken points and sharpen whatever needs sharpening before handing them out to the kids.  It will save time later.

In the classroom, set up the kids’ places for them.  Each student starts out with a desk protector, a sheet of white paper, a pencil, a little paper towel, and a box of watercolor pencils.  Each table group gets a page of Beatrix Potter character pictures in a clear sleeve to share.  (There are 6.)  You can decide how to distribute the stencils.  Kids will have to share and take turns for the one they want to use, but drawing around the stencil only takes a moment. 

You should wait to hand out the brushes and water jars until most of the kids are done drawing with the colored pencils.   They don’t work well on wet paper, so the kids should draw first, then brush the water after.


The Project

(Things you might want to say to the kids are in purple.)  Try to think of questions to ask the kids as you go along.   Present the artist to the kids and show her work.  Then show them the samples of our project.  Put the Large Beatrix Potter prints and the project samples where the kids can see them.  Put the large page of animals on the docucam.  Have the kids start by writing their names AND their teacher’s name in pencil on the back of their paper. 

Introduction

Today we are going to make pictures of Beatrix Potter’s animal characters.  We will use stencils to draw an outline of the animals, and then draw the rest of the picture by hand.  If you want to draw a picture freehand without a stencil that’s great.  If you want to draw your own animal character different from these, that’s great too.  You will be the illustrator.  We will color the characters in with watercolor pencils, and after we finish our drawings, we’ll go over them with wet paintbrushes to blend the color and make it look like watercolor paint.
One important thing about this project – the watercolor pencils don’t work well on wet paper.   So we will do the pencil coloring first, and then move on to the paintbrush and water.

Step 1: Choose what character to use, or make one up

We need to start with regular pencils first to draw the characters and the backgrounds.  Choose which stencil you want to use if you are using a stencil.  You’ll need to take turns.  Be careful with the stencils – they have to last through lots and lots of kids using them.  Hold it down and be careful not to move it while you draw around it.

Step 2: Think about what your charter is doing, and where it is. 

Next you need to draw a little bit of background for your character.  Think like an illustrator.  Your picture will tell a little piece of a story about the character.  Think about where he is, what he is doing, what objects might be next to him.  Sketch a background in with regular pencil to tell the story about the character.

Step 3:  Color it in

Next you will use the watercolor pencils to color the picture.  Try to show the animal’s texture with the marks you make.  Feathers and fur have different textures. 


Step 4:  Use a wet paintbrush to blend the color

Hand out water jars with not too much water in them to groups of kids, and hand out paintbrushes. 
To use the brushes, get them wet and shake them off in the jar so you don’t get your papers too wet.  You can use the paper towel to dab extra water off of your brush.  When you go over your drawings with the water and brushes, try to do one color at a time and wash the brush off in the water in between.  You don’t want to smear all the colors together too much.
You don’t need to get the while paper wet – just the colors you drew.  If you have too much water on your paper, you can dab the paper with the paper towel too.


Afterwards / Clean up

Please make sure to collect all the tools before you leave the room (place mats, bags of watercolor pencils, paint brushes and pencils), and ask kids to look for missing items.  Please count the bags of watercolor pencils and make sure the sets have not gotten put into random bags.    If you are in a portable, dump out water jars outside the door.
Please save un-used sheets of white paper and paper towel for use later.  Put them into the box in the library.  Put the wet pictures in the drying rack and cover it with the large trash bag to keep it dry on the way back to the library if the weather is wet.  Leave wet items on the rack in the library.  The next person to use the rack can take them off and put them into a manila folder. 

Please wash the brushes in the sink and leave them upright in the plastic container on the cart.

If any of the stencils are damaged, please put them in the extra paper box and leave me a note.  Even email me if it needs to be replaced right away.  I hope the stencils will hold up.

Thank you!                                              
November 2018


Monday, October 8, 2018

Wednesday, September 26, 2018

Gustav Klimt


Templeton Elementary School Art Literacy Program

Gustave Klimt Bio Presentation
Art vocabulary words:  Symbolism

Calendar at bottom of post.


Gustave Klimt was born in Vienna Austria in 1862 to a poor family with seven children.  He was very talented from a young age, and he got a scholarship to study at the Vienna School of Applied Arts and Crafts.  His early work is very traditional, but over time his art became much more unusual.  Klimt painted many murals and ceilings in public buildings in his early years as an artist.   Here is a photo of Gustave Klimt.  


Klimt’s paintings were not liked by everyone, but he found a way to support himself whether or not people liked his unusual art – he painted portraits of very rich women in Vienna.  His portraits were wonderful.  The figures often fill the frame from top to bottom, with beautiful, realistic faces. 


  The clothing is much less realistic, made up of shapes filled with fabulously detailed patterns.  


Here is one of his portraits (figure 4: either Emilie Floge or Adele Block Bauer). 


See how the clothes are just bands of color and pattern? 


When Klimt was 32, he and some of his friends in Vienna formed a group of artists called the Secession.  They made art that was different and exciting, and their motto was, “To each age its art, and to art its freedom”.  What that means is that they wanted to make art in a new way, for a new generation of people, and the art they made would be fresh and free from the rules artists used to follow.  This is one of Klimt’s most famous paintings, called The Kiss.  (figure 2)


Klimt liked to paint pictures of women, mostly, and he made them look exotic and mysterious, often using elements from Japanese and ancient Egyptian art, and he used a lot of symbolism in his work.  “Symbolism” means using a certain image that people recognize to mean something, like an image of a heart might be a symbol for “love”.   This is part of Klimt’s painting called the Tree of Life.  (figure 3) 


Trees are a symbol of the connection between the earth and the sky, and between life and death.  If you look closely you can see eyes in the tree that are an Egyptian symbol for good health and protection.


Klimt’s backgrounds are not realistic either.  (Show figures
5 A/B and 6 A/B).  


Sometimes they are wild collections of flowers and symbols, and sometimes just varied shades of color.  Klimt used a lot of gold and silver in his paintings during the height of his career.  That time was called his “golden Phase”.  His most colorful paintings came later.


Today we will be making a portrait in the style of Gustave Klimt, and there is gold and silver paper to use if you want to, and lots of color as well.


Templeton Elementary School Art Literacy Program
Gustave Klimt Mixed Media Portrait Project

Getting ready

Presenters, first thing, please sign onto the Art Lit cart sign-out sheet on the wall.  That way we know where the art carts are at any time.  Presenters should only be coming in at a time they have officially signed up for.  Next, please check the Art Lit cart for the supplies you will need.  The presentation folders and the tools should all be kept on the carts.  You will need to take 3 items from the counter, unless the person before you put them on the cart.  These are the supplies you will need:

On the cart:
Presentation folder and art samples
Desk protector sheets (30)
Glue sticks
Bag of pencils and pencil sharpener
6 empty blue containers for paper bits
Scissors
6 boxes of colored markers
Take from the counter:
1 bag of mixed papers for collage
1 stack of 30 sheets of white paper
1 bag of faces (30 men and 30 women)


In the classroom, set up the kids’ places for them.  Each student starts out with a desk protector, a sheet of white paper, a pencil, a pair of scissors, and a glue stick.  Each table group gets a box of colored markers.  (Please don’t move markers from box to box.  Each set has a good range of colors and we want them to stay that way.  If your class has fewer than 6 table groups, just don’t use all the boxes of markers.)  You will need to portion out all the little papers for collage into the blue containers, one for each table group (up to 6).  Try to do it evenly so every child can have a bit of everything.  If you sit down and deal the papers out like playing cards into the number of piles you need, you’ll get  good distribution. Next, divide up the faces from the faces bag.  Give each table group about 5 men and 5 women to choose from.  Once the kids are there you can adjust from table to table if someone wants a face they do not have at their table.  You may want to cut the faces apart in advance so the kids don’t cut through the faces other kids need to use.    


The Project

(Things you might want to say to the kids are in purple.)  Try to think of questions to ask the kids as you go along.   Present the artist to the kids and show his work.  Then show them the samples of our project.  Put the Klimt samples where the kids can see them.  Put the page with two examples on the docucam so the kids can see the details.  Have the kids start by writing their names AND their teacher’s name in pencil on the back of their paper. 
Introduction

Today we are going to make a multimedia portrait in the style of Gustave Klimt.  “Multimedia” means artwork that uses more than one type of art supply, or medium, to make it with.  We will be using colored markers and paper collage.  We will be making portraits of people.  We will try to make our figures’ clothes and backgrounds out of blocks of pattern and color.  You can choose paper patterns to use or draw patterns with markers, or do both. 

Step 1: Choose a face and plan the composition

To start, choose a face you want to use for your portrait.  If you like, you can draw a face yourself, or you can use one of the faces we have printed out for you.  You can cut off the extra paper around it if you like.  Place the face on your paper and move it around; think of where you want the figure to be.  Make sure to leave room for the body below the face.  Gustave Klimt liked to paint portraits of people with their heads right up near the top of the picture.  Use your pencil to lightly sketch out the body and the background.  When you’re sure where the face will go, you can glue it down. 

Step 2: Choose colors of paper to use, and lay them out

Next you should look at the colored and patterned papers on your table.  Think about what colors you’d like to use together.  You can share pieces if more than one person wants to use a certain paper.    Try to cut out your shapes along the edge of the paper instead of in the middle, so the rest of the piece can still be used again.   There is enough silver and gold paper for everyone to get one piece of each, so make sure you don’t take more than your share.  You can do a lot of collage on your portrait if you want, or you can do a lot of drawing on it with markers.  It’s your choice.  
It’s a good idea to lay out your pieces of paper before you glue them down so you can see if you like the arrangement.
Give the kids some time for this.


Step 3:  Glue the pieces down and draw with markers

When you like what you have, glue it down.  Fill in empty parts of the picture with markers.  When Klimt made portrait backgrounds, sometimes he drew intricate flowers and plants, like the person was standing in a garden, or in front of wallpaper.  Sometimes he painted detailed designs all over everything, like swirls, or little interlocking bricks of color and gold.  Look at the examples and think of designs you can use in your own picture.
You can go back and forth as you work, drawing with markers and then going back and gluing down some more paper.    Try to fill in your paper as much as you can, but when you think it is perfect, it’s finished.  You’re the artist. 


Afterwards / Clean up


Please make sure to collect all the tools before you leave the room (place mats, scissors, glue sticks, markers, blue bins and pencils), and ask kids to look for missing items.  We can’t afford to replace things.    

If it is a wet day and you are in a portable classroom, you might tuck the stack of finished artwork in between the plastic place mats to stay dry on the way back to the library.

Ask the kids to pick up all the large or unused pieces of colored paper and return them to the bag.   PLEASE SAVE ALL UNUSED PAPER AND LARGE SCRAPS FOR RE-USE.  Put them into the box in the library.   Have the kids pick up and throw away all the small bits.

Ask the kids to put the pens back into the boxes, and if any went off their tables, check the numbers on the pens to see they get back into the box with the same number.  If any of the pens run out, there will be a box in the library to put them in, so I will know which ones we need. 

Take all projects back to the Art Lit area, do not leave them in teachers’ rooms.  There will be manila envelopes on the library counter.  Please write the teacher’s name on one and put your projects inside.  Leave it in the project box.  We save them to display, then they will go home later on.

Thank you!                                                                                                               September 2018