Pages

Tuesday, September 24, 2019

Vincent Van Gogh

Vincent Van Gogh~1st artist in Art Literacy for 2019-2020 School year! 

(Calendar is at end of Post)

Please look at it before emailing or texting me to schedule a day to present


Here is the PowerPoint that will be e-mailed to teachers. They need to bring their laptops if you want to use it in the Maker Space. 

Note-You do not have to use the PowerPoint and maybe only show paintings and not go too far into Vincent's Depression, and his suicide. Although, years ago, the students thought it was very interesting that he cut off his ear. Which shows how mentally ill he was. 😉


 Vincent van Gogh was born in Holland in 1853.  By the age of 27, he had tried teaching, shop work and preaching, all without success.  Then, he decided to devote himself to art. But he struggled to make a living and managed to sell only one painting during his life. Today his pictures are worth millions.


 Vincent Van Gogh painted thirty-seven self-portraits, all but ten done while he was in Paris.


Vincent wrote to his sister that she would probably thin the study of his “empty bedroom with a wooden bedstead, the most unbeautiful thing of all.”  To Vincent, however, his room in Arles was important.  It was the only house he had for himself, the “yellow house” that would welcome Gauguin, Signac, and other artists seeking the sun.  Vincent carefully furnished the room and decorated them with his own personal paintings and framed prints.


 His pictures show a dramatic night sky with twinkling stars and twisting trees.  The scenes have been built up out of layers of paint so thick, you can see the brush marks.  Van Gogh liked to use strongly colored paint, often straight from the tube.  His intense colors and swirling brush strokes make his pictures vivid and full of movement.
Starry Night - SPACE:  The enormous cypress tree in the foreground helps the viewer understand the arrangement of space. COLOR:  The yellow highlights in the sky help move your eye around the mostly blue composition.  LINE:  Van Gogh uses spiraling lines to create the swirling night sky.  TEXTURE:  The artist uses visible brushstrokes to create areas rich with texture.


Sadly, van Gogh suffered from mental illness.  In one famous incident, he cut off part of his left ear after arguing with a friend.  By 1889, he was in a mental hospital.  He continued to paint furiously, but became more and more depressed.  A year later, he shot himself.
This is one of his last big canvases.  He painted this panorama only weeks before his suicide.  This is a straightforward painting about a coming storm.  Harsh winds have darkened the sky, churned the clouds, frightened the crows, and knocked the grass and wheat to the ground.


Vincent Van Gogh Bio, and discussion of 
The Starry Night

Vincent Van Gogh was a Dutch painter who lived from 1853 to 1890. 


He only painted for 10 years, but he created around 2100 works of art.  He sold one single painting while he was alive, but later people loved his work so much that he is now thought of as an artistic genius, and he is one of the most famous artists of all time.  

Vincent van Gogh was a very serious child, and he had trouble figuring out what to do with his life.  He tried a number of jobs.  At the age of 27 he decided to try being an artist.  His brother Theo encouraged him and supported him the whole 10 years that he was producing art, since no one would buy his paintings.  
Vincent van Gogh’s work changed over time, from very dark early work to very bright, vibrant later work.   

 Fishing boats
Bedroom in Arles

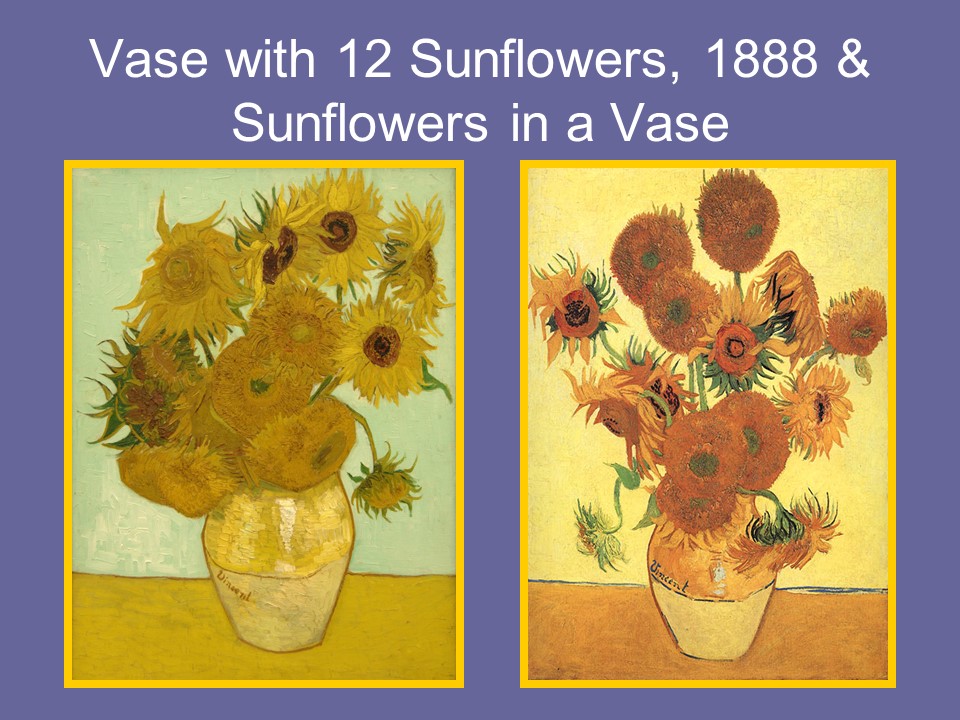
His style used thick brushstrokes of many colors layered over each other.  The brushstrokes make swirls and patterns in some of his work, and make his paintings look very dramatic and lively.  He painted portraits of people, many landscapes, and many still lifes.  His sunflower and iris paintings are very famous.  

 Irises
Sunflowers

Van Gogh had poor health, and had mental illness of some kind.  It was hard for him to live with other people, so he was lonely, and sad, and he couldn’t take care of himself properly.  But some people who have studied van Gogh think that his amazing artwork was a result of his mental illness, and other physical problems he had.  He looked at things a different way from other people, and he may have even seen things differently.  
When Vincent van Gogh’s mental illness became too much for him to bear, he moved to an asylum so doctors could help him.  He stayed there for two years, and while he lived there he created many works of art, including the painting we are going to be thinking about today – The Starry Night.  

The Starry Night

Van Gogh painted pictures of the buildings, and the garden of the asylum, and the country outside.  He loved the tall cypress trees that grew in the countryside around the asylum.  He painted many pictures of the cypresses and olive trees, and the wheat fields, and the hills beyond.  The view we see in the Starry Night is actually the view he saw out his window, with a few creative changes, and from the time of year he painted it, experts could tell the brightest star in the picture is actually the planet Venus.  

Would the sky ever really look like the one in the Starry Night?  Or is the artist painting what he sees in his imagination?  Van Gogh actually didn’t like The Starry Night as much as other pictures of starry skies he had made.  He thought it was not realistic enough.

Many art experts have looked at the painting and seen it different ways.  The huge swirl in the sky could be a picture of a galaxy of stars, far away.  It could be wind, or turmoil inside van Gogh’s head.  The huge stars and swirls could be van Gogh’s way of showing that he thought there was tremendous power in the universe, and that people are only tiny in comparison.  The brushstrokes he uses to paint the town and the land are very straight and orderly, but the brushstrokes he uses for the sky are wild and swirling, like they are all moving at once.  You can see the tremendous feeling that van Gogh put into this painting.  


Vincent van Gogh – Starry Night Painting Project

Getting ready

The supplies should be waiting on the Art Lit cart, in the storage closet of the Maker Space room.  (Not in the kiln room, the other storage room.)  You can either reserve the Maker Space room to use during your lesson, or you can take the cart to the classroom.  There is an elevator to reach upstairs classrooms.  These are the supplies you will need:

*Plastic placemats
*Canvas boards (take enough for the class – keep extras clean and put them back.
There will be a cart full of them in the storage room.)
*Stencils (to share, and only if kids really want them)
*Sketches of the main composition elements in plastic sleeves, 1 per table
*Pencils
*Water jars, maybe 2 or 3 per table
*Plastic palettes, 1 for every 2 kids to share
*Paintbrushes, 1 larger and one finer for every kid
*Paper towels, 1 per kid
*Squeeze bottles of tempera paint
*Bucket with dish soap, sponges and scrub brush
*A couple of rags to dry with

If you do the lesson in Maker Space, use the new drying racks along the windows.  If you are taking the cart to a classroom, you’ll need to take one of the old drying racks, which we will keep in the storage room where the cart is. 

If there are paintings in the drying racks and they feel dry enough, carefully stack them so the racks will be empty.  There should be some clear plastic trash bags in the “finished artwork” box, along with tape and a marker.  Please bag the set of dry paintings, and if you can tell which class they are from, please write the teacher’s name on a piece of tape and stick it on the bag.  Then put the whole bag into the “finished artwork” box in the storage room. 

Set up the kids’ places in advance.  Each place gets a placemat, a pencil, a canvas board, and a paper towel.  Fill water jars maybe 2/3 full of water and set 2 or 3 on each table to be shared.  Put tempera paint into the palettes.  This may take some time.  Use half as many palettes as you have kids.  They will share.  (If there are kids who have issues that make this hard, they get their own palette, but don’t put as much paint on it.)  Use the squeeze bottles of paint to put a good amount of every color in the holes on each palette.  Don’t fill them too high to avoid spillage and waste.  Students can raise hands during the project to ask for more of a certain color.   Keep the palettes on the counter until after the kids have penciled in their picture, then hand them out. 
In the event that the squeeze bottles are running too low on any color, the large jugs of tempera are all on the shelves in the Art Lit storage closet, against the back wall.  You can refill them.   FYI – tempera paint is not permanent, like acrylic.  It will wash off the brushes fairly well.  However, it could stain clothing.

The Project

(Things you might want to say to the kids are in purple.)  Try to think of questions to ask the kids as you go along.   Present Vincent van Gogh’s work to the kids, then show them the samples of our project. 

Part 1 – Sketching

Today we are going to create our own versions of Vincent van Gogh’s painting called The Starry Night.  It doesn’t have to look just like his.  He painted 21 different versions of it himself. 

First we will sketch in the main parts of the picture with pencil, and then we will paint it.  

(If you want to let kids use the stencils to put in the main bits of the composition, you can tell them to pass the stencils around to share.  If you want them to do it all themselves, don’t even mention the stencils.) 

First thing, write your name and your teacher’s name on the back of your canvas.

Now, we’ll start by drawing in a horizon line from one side of the canvas to the other.  The horizon line separates the land from the sky.  It should have some bumps in it to show hills on the earth.  If you like, you can look at the sketch of the painting to make it easier.

Next, draw a tree shape in front of the horizon.  The tree should be large, to make it look like it is close to you.  It doesn’t have to be a cypress tree.

Now, draw the moon and stars.  You only need little circles for now.  You’ll paint them in later.

Draw the swirling shapes in the sky.  They may look like the letter “S”, or like a spiral.

Last, draw some little buildings on the land, to look like a town.


Part 2 – Painting

Hand out the paint filled palettes.  Tell the kids:

This is tempera paint.  It needs to go onto the canvas thick, so you don’t need to get the brush wet before you put it in the paint.  You only need the water to clean the brush between different colors.

You may want to start by putting color onto large areas of your picture, like the sky, or the tree, or the land.  Try to leave the spots for the moon and stars open until you paint them light colors.  If you paint them dark first it’s harder to make them light later. 

You can mix colors too, on the edges of the palette or on the canvas itself. 
 If you fill in large areas first, you can go over them later with more colors to make it look more interesting, or you can try using little brushstrokes of many colors, like van Gogh did. 

Don’t paint the details until the end.

Make sure to give the kids a 10-minute warning to finish up, and save a few minutes at the end for clean up. 

Afterwards / Clean up

Collect the pencils.  
Have the kids put their finished paintings into the cardboard drying racks (if they can reach).  
Then have the kids throw away their paper towels, put their dirty paintbrushes in one bucket, and the paint palettes in the other bucket.  Please use the deep sink in he Maker Space for all messy clean up like paint. 
Once the kids have left the Maker Space room with their teacher, do the rest of the clean up.  (Or take it back to the Maker Space to do if you are in a classroom.  Use a bit of dish soap in the bucket to clean the brushes well.  Leave them standing on end in the jars on the cart for the next class. 
Scrub out the palettes with the scrub brush and put them back on the cart.
Wipe any paint off the placemats with a damp sponge, and put them back into the carrying bag on the cart.  (You can wipe them with a rag if they are too wet, then please spread out the drying rag to dry a bit.)


Wednesday, September 18, 2019

Welcome School Year 2019-2020

New School Year of 2019-2020
Art Literacy 

Welcome to an amazing year filled with Artists and fabulous art creations! 

We will have 6 Artists that we will learn and discover this year.


Laurie Gregory and Laura Cox, our Co-Coordinators, have worked this summer planning our projects to go along with these Artists. They have worked hard to make sure these projects are organized. This is their 3rd year and they are so amazing, making it easy for the volunteers to step in and teach! Really... they do a great job! I am so thankful for their dedication and passion for the children to learn and get a chance to create art! 

Not only do we have amazing leaders we have a beautiful new school! This is going to be a great year!

Volunteers will be presenting a short biography of each artist and show examples of their work to each class! After this... comes the creativity and fun! The kids get to create art that is inspired by the Artist. I love to see the art work that comes from the children! 

We are so happy to have volunteers! Volunteers are essential to this program of Art Literacy. Without YOU the children get very little art in the classroom! 

⇶ Please join us for our first Art Literacy training on 
Tues, Sept 24th @ 7pm 

It will be held in the Maker Space. This room is across the library toward the 2nd grade Neighborhood. 

After the meeting you may contact your teacher and then email me or text me to reserve either the Maker Space, if available, or a Cart to take to classroom. 

We have 2 carts. It is really important to schedule your times with me so that things work smoothly.

cynthiaklarsen@hotmail.com  or Text me
503-737-5510

Thank you so much for volunteering! We have a few classes still needing volunteers. If you love art as much as I do...maybe you would be willing to do more than one class. We want all of the students to get the opportunity to create and have fun this year!

Thank you again, 

Cynthia (Cindy) Larsen,  (Blog updater, scheduler for the art carts and Maker Space, Volunteer in my children's classes here at Templeton for the last 10+ years)


Here is the Art Lit Calendar ↓↓↓↓


Monday, May 6, 2019

Paul Cezanne


Here is the last Artist we will talk about this school year (2018-2019)! Thank you for the hard work from teachers and from the Volunteers! Children had such a wonderful year and we thank our Art Literacy directors! 


Templeton Elementary School Art Literacy Program

Paul Cezanne Bio Presentation
(Note:  as exhibits, use the double page of Cezanne’s work on the docucam, and show his self portrait.)

Paul Cezanne (pronounced say-ZON)  was a French painter who lived from 1839 to 1906.  He is well known for being an artist whose work bridges the gap between the style of art called “Impressionist” with a  more modern art style called “Cubism”. 

Impressionists painted scenes from life, trying to show the light in bold brushstrokes of vivid colors.  Cubists tried to paint an object as if you were seeing all sides of it at once, the pieces broken up and stuck together.

Look at these landscape paintings by Cezanne.  They show us a number of important things about his work:
·       He painted from life.  That means he sat outside and painted the landscape that he saw.
·       He took what he saw and tried to make it into a series of shapes.  He looked at the landscape and saw cylinders and spheres, cones and cubes.
·       He didn’t blend his colors together very much, but used bold strokes of color next to each other instead.  You can clearly see his brushstrokes.
·       He often used black to outline certain things in his pictures to make them stand out from other things.

Who plays Minecraft?  Everything in the Minecraft world is broken up into pixels, little blocks of color.  Can you see how Cezanne’s paintings are a bit like that?

Self Portrait~Cezanne


Landscape Paintings by Paul Cezanne
(for Docucam)

 Mont Saint-Victoire seen from Bibemus Quarry
 L’Estaque
 The Bay of Marseilles, view from L’Estaque   
 Jas de Bouffan
 Mont Sainte-Victoire   
 The house with the cracked walls
 Maison Maria on the way to the Chateau Noir
Mont Sainte-Victoire


Templeton Elementary School Art Literacy Program

Cezanne Oil Pastel Landscape Drawing

Getting ready

Presenters, first thing, please sign onto the Art Lit cart sign-out sheet on the wall.  That way we know where the art carts are at any time.  Next, please check the Art Lit cart for the supplies you will need.  The presentation folders and the tools should all be kept on the carts.  You will need to take a stack of white paper from the counter.  These are the supplies you will need:

Presentation folder
Desk protector sheets (30)
White paper (30 sheets)
Bag of pencils (30 or so)
6 stacked plastic boxes of pastels
Baby wipes
Landscape photos in plastic sleeves (40)

In the classroom, set up the kids’ places for them.  Each student starts out with a desk cover sheet, a sheet of white paper, and a pencil.  Each table group gets one large plastic box of pastels to share.   (I put them in the large bins so it will be easier to find the colors kids want.)   It’s possible someone may need to switch seats to be close to pastels.  Distribute the landscape photos however works for you.  There are more than enough for the class, and they are double-sided, so everyone should be able to find a picture they can enjoy drawing. 

The Project

(Things you might want to say to the kids are in purple.)  Try to think of questions to ask the kids as you go along.   Present the artist to the kids and show his work.  Then show them the samples of our project.  Keep the Cezanne landscape painting examples up on the docucam during the project so the kids will be reminded of his style and technique. 

Have the kids start by writing their names AND their teacher’s name in pencil on the back of their paper.  Please tell the kids not to share pastels from one table to another.  Each container has a certain selection of colors, and if they are moved around, the kids in the next class will not have the colors they need.


Introduction / Technique

Today we are going to do oil pastel drawings landscapes in the style of Paul Cezanne.  Choose a landscape photo you would like to draw.  Please don’t take the photos out of the plastic – we want them to stay clean.
 
Think about your picture before you start using the pastels.  Think about what colors you want to use.  It might be easiest to lightly sketch the picture in with pencil before you start drawing  with pastel.  You don’t have to use the colors that are in the picture you are working from, and you don’t have to fill it all in unless you want to.  It’s important to remember, when you draw with oil pastel, you can’t go back over it with another color very easily.  You may be able to make it darker, but once you put in a dark color, you can’t make it light again.  SO, think about where you want to keep the drawing white or light colored, and make sure you don’t put in too much color in those places. 

If you want to blend your oil pastel lines, you can rub them with a finger.  If you want to mix colors, you can do that by drawing lightly with one color, then going over it lightly with another color.  

Think about the way Cezanne made his pictures.  When he painted a rock, it would be made up of little chunks of different shades of brown and gray.  He didn’t blend colors together very much, but put strokes of them side by side.  And he used black outlines to make elements in his picture stand out.

Afterwards

Please try to make sure the pastels go back into the same containers, and stack them with the one lid on top.  Please count the pictures in plastic sleeves and the pencils before you leave the room, and ask kids to look for missing items.   After kids clean up the supplies, they will probably need to wash hands.   Use baby wipes as a last resort, but try to send them to the classroom sinks or bathrooms to wash hands.  PLEASE SAVE ALL UNUSED PAPERS FOR RE-USE.  Put them into the box in the library.  Take all projects back to the Art Lit area and put them into a folder with your teacher’s name on it.  Folders will be on the counter. 

Thank you!                                                                                                 May 2019

Friday, April 12, 2019

Broadway Rose Theater Contest


Templeton Elementary School 
Art Literacy Program 
Broadway Rose Art Contest


🔶Presenters, first thing, please sign onto the Art Lit cart sign-out sheet on the wall. You don’t need a cart for his project, but we have only 2 bags of markers, so only two classes can use them at a time.


 These are the supplies you will need: 

1. The envelope with your teacher’s name on it (it holds your entry form papers)
2. The folder of instructions
3. A stack of scratch paper (count out what you need)
4. A bag of Sharpie markers (40)


 The Project and the Contest Rules

⬨The students are going to use black Sharpie markers to create an illustration for the cover of the    play program for the Broadway Rose Theatre production of Cinderella this August.

⬨Two students from each grade will win tickets to the play and prizes too.

⬨The top two pictures will be chosen to be on the covers of the play programs.

⬨There are two different dates on the cover blanks, because one picture from each date will be selected as a cover. Your class may have one date or both, it doesn’t matter.


🔶Broadway Rose has some very strict rules that must be followed.


(The page that shows the list of prizes is just for you to see, you don’t need to read that to the kids.)

The most important rules for the students to follow are: 

1. No words may be in the drawing. 
2. Only black Sharpie can be used. 
3. Don’t draw outside the box. 
4. Try to make your drawing big enough to fill the box. 
5. The pictures must be your own original ideas, not copies of anything like Disney characters. 
6. The picture must be finished and collected during this class period. 

🔶Put the “Cinderella Art Contest” page on the docucam so the kids can see the main rules to remember. Go over all rules carefully. 

🔶Read the synopsis of the play to the kids, or read a short storybook version (if you bring one), or you can read them the play (leaving out the songs), but it will use up a lot of the drawing time. The play is fairly close to the classic story, but with less emphasis on people’s looks, and more on their personalities.

🔶Tell the kids that this is an illustration project. Remind them that illustration is art that tells a story, just like pictures in a book. It should make people think of the story when they see it. The picture doesn’t have to tell the whole story, it just has to contain some images that are important to that story in particular.

🔶Discuss the images they might use in a Cinderella illustration that would make people think of Cinderella.

🔸The images could be characters, places, or items that are important to the story. If you ask the class, hopefully you will get answers like: • Prince, princess, fairy godmother, mean sisters • Castle, fireplace, village, ball • Pumpkin, mice, carriage, magic wand, glass slipper, clock, moon


🔶Before they start, have the kids write their names on the entry form that is stapled to the back of their sheet. DO NOT USE SHARPIE TO WRITE NAMES, it might soak through and spoil the drawing paper. And we do not have any more. This is it.  Help the little ones with this, as the names must be legible. Be certain everyone has a legible and complete name on their paper before starting.
Use pencil or ballpoint to write names, then have kids fold the entry form out from the drawing sheet if they want to so it won’t make a bump under the paper they are drawing on.

🔶 Ask the kids to test ideas on the scratch paper first, in pencil. (We are not supplying pencils this time, as they surely have some in class.)
Sharpie is forever, and no one gets another entry sheet, so definitely encourage them to do pencil sketches before the final.

 In fact, if the kids feel better about doing it in pencil first, they can use pencil to do the actual drawing on the official papers. Just be sure they go over all pencil marks in Sharpie or erase them afterwards.
🔶Broadway Rose does not want to see any pencil marks. Let the kids draw as long as possible, and give them a little warning before finish time. If someone’s pen is wearing out, give them another. (Hopefully they will make it through the project. We have more used ones, but no more new ones.)

 Afterwards / Clean up 

Please make sure you get all the Sharpie markers back. You should have started with 40. If any are truly running out, please put them in the box for re-usable items in the art lit area in the library. We will replace them with some that are less used.
Please put the finished artwork back in the folder, and put it in the back of the box of folders. We will get it over to the District Art Lit Coordinator.

Thank you! April 2019


 “Cinderella” 
(*a synopsis for the purpose of saving time during classroom presentation for time to illustrate!)


A young and shy prince, about to turn 21, rules the kingdom. Outside the kingdom lives a young girl, named Cinderella (Ella), with her two mean stepsisters. (Note: this version does not mention a stepmother). Cinderella never complained about the many chores given to her by her step-sisters, Repulsa and Obnoxia. They received an invitation to the Royal Ball, where the prince will hopefully meet his future wife. The step-sisters tell Cinderella that she cannot go to the ball. The night of the ball, a fairy Godmother appears and puts a magic spell on Cinderella, a pumpkin (that turns into a carriage), mice (that turn into horses), etc. Cinderella is ready for the ball, complete with glass slippers. She must be home by the stroke of midnight, as the spell will wear off at the last chime of the clock. At the ball, the stepsisters are talking and dancing with the prince. The prince needs a break, takes off his crown, and heads outside to the terrace. Cinderella arrives at the ball and ends up out on the terrace with the prince. She does not know he is the prince as he is not wearing the crown. She catches him “talking to the moon.” She says she talks to the moon too. They talk a bit more and find out they have things in common. They dance and learn a valuable lesson: “Almost anything can happen when one is least expecting it.” Midnight arrives and the clock begins chiming! Cinderella runs off. The prince runs after Cinderella and the step-sisters run after the prince! Cinderella loses one glass slipper! The next morning there is a kingdom wide search for the girl wearing the glass slipper. The step-sisters hear this (although not knowing Cinderella was the one!) and trick Cinderella into looking in the wood closet for one of the cats. They shut the door and locked her in. The prince arrives and the step-sisters try on the glass slipper which did not fit either one of them. There is a knocking coming from the inside of the closet door. The prince opens it, and out steps Cinderella. She realizes the nice man she was talking to the night before was the prince. She tries on the glass slipper and it fits! The prince asks Cinderella her name and she introduces herself. “Will you be my princess?” the prince says. “I will and we can talk to the moon together.” replies Cinderella. They were married…and they lived happily ever after! [A story about good-heartedness, being yourself, and most of all about wishes and dreams]

~The full script will be on the cart. It is 25 pages.


RULES AND PRIZES


 ART LITERACY/BROADWAY ROSE ANNUAL ART CONTEST RULES

• NO WORDS
• ILLUSTRATIONS DONE IN THE CLASSROOM ONLY (NO TAKE HOMES)
• DRAW INSIDE THE BLANK BOX ONLY & STRIVE TO FILL IN THE SPACE
• DRAW ORIGINAL IMAGES (NO COPYING DISNEY CHARACTERS)
• USE A BLACK FINE SHARPIE (NO COLOR)
• FILL-OUT ENTRY FORM AND STAPLE (FACE SIDE UP) TO BACK OF ILLUSTRATION
• ALL ENTRIES MUST BE SUBMITTED BY THE DETERMINED DEADLINE


 -------------------------------------------------------------------------------------------------------------------------• TWO WINNERS (ONE FOR EACH PLAY) AT EACH GRADE LEVEL – K-5 (12 winners total)
 • TWO GRAND PRIZE WINNERS – WINNING ILLUSTRATIONS ON PROGRAM COVERS
 • WINNERS ANNOUNCED AT A SCHOOL-WIDE ASSEMBLY
 • EACH WINNER RECEIVES:
 1. Two tickets to the B. Rose Children’s performance – provided by B. Rose
 2. A behind-the-scenes tour prior to the performance – by a B. Rose representative
 3. A bag of art prizes – provided by the District Art Literacy Program
 4. An information packet and congratulatory letter – by the District Art Literacy Coordinator


Here is a link to the the Broadway Rose Theater~ Broadway Rose~Cinderella